
AI Tools · Sticker & Emote Creation
Two prompts, one photo, and you've got an entire personalized sticker pack ready for WhatsApp, Telegram, or Discord — no design software, no drawing skill, and no paying someone on a freelance site to make it for you.
This guide walks through two ready-to-use ChatGPT prompts: one that generates a full 3×3 sticker sheet in whichever art style you pick, and a second built specifically for Twitch and Discord-style chat emotes that stay tiny, expressive, and instantly readable at 28 pixels. It also covers the part most tutorials skip entirely — how to actually crop a generated sheet into individual stickers and build them, one at a time, into a real sticker pack on WhatsApp and Telegram.
📋 Table of Contents
- What You Need Before You Start
- Prompt One: The 3×3 Sticker Sheet
- Every Style You Can Swap In
- Prompt Two: Twitch and Discord-Style Chat Emotes
- Cropping the Sheet Into Individual Stickers
- Building the Pack on WhatsApp, One Sticker at a Time
- Building the Pack on Telegram
- A Few Things That Make This Go Smoother
1. What You Need Before You Start
- Access to ChatGPT with image generation enabled, or any similarly capable AI image tool that accepts an uploaded photo as a reference.
- A clear photo of the subject — yourself, a pet, a mascot, or any character you want turned into stickers.
- A basic photo-cropping tool, which is genuinely just your phone's built-in photo editor in most cases.
- An up-to-date copy of WhatsApp — the native sticker and pack creation tools covered in this guide require a reasonably current app version to appear in the sticker tray.
2. Prompt One: The 3×3 Sticker Sheet
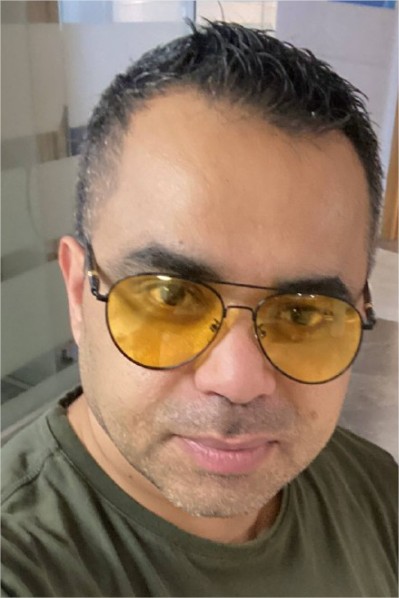
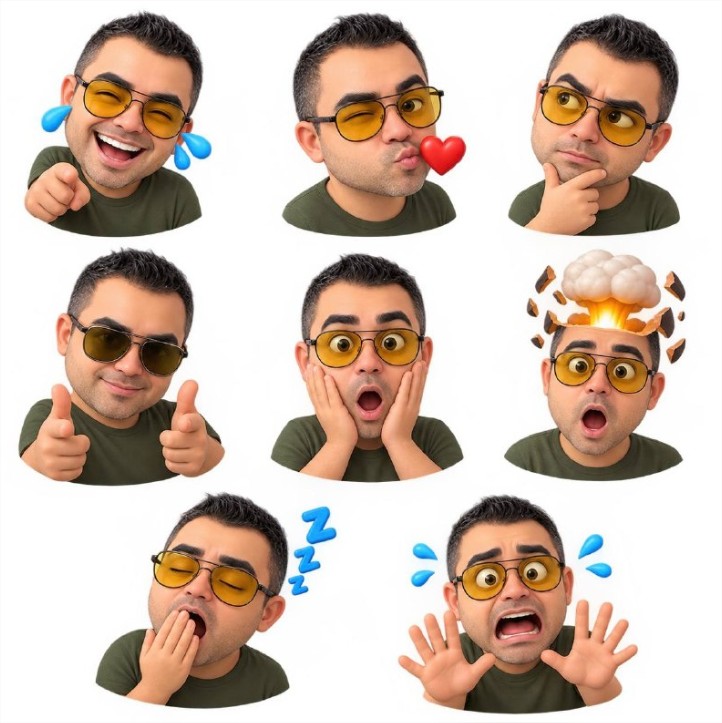
This first prompt generates a full sheet of nine distinct stickers arranged in a grid, each with a different pose or expression, all in a single image you'll crop apart afterward. Upload your reference photo alongside it.
Create a 3D sticker pack based on the images attached, remixing with .
Use rounded, toy-like forms, smooth polished materials, soft studio
lighting, subtle ambient occlusion. Create a single square (1:1)
transparent sticker sheet with nine distinct stickers arranged in a
3×3 grid, each showing a different expression, pose, or reaction.
Separate the stickers with wide, fully transparent gaps. No
background, shadows, or overlapping elements.
Example source image:
Example result:
3. Every Style You Can Swap In
The word "3D" in the first line of the prompt is the only part you need to change to get a completely different look. Swap it for any of these:
4. Prompt Two: Twitch and Discord-Style Chat Emotes
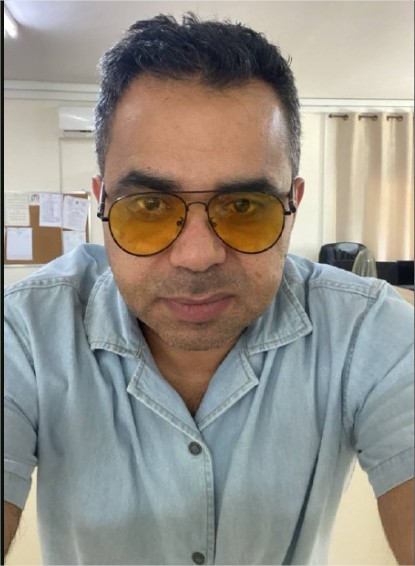
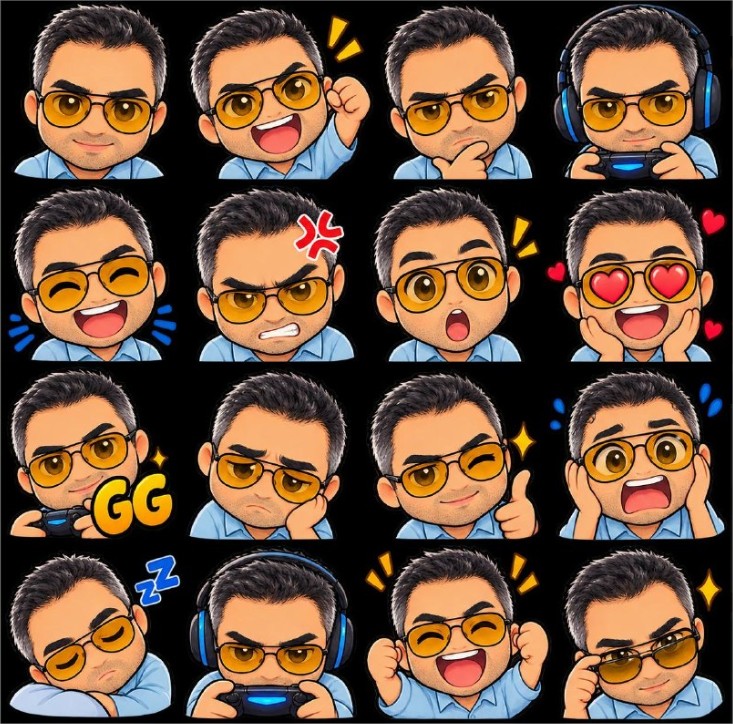
Chat emotes are a different beast entirely from stickers — they're viewed at roughly 28x28 pixels inside a scrolling chat, so subtlety is wasted effort. This second prompt is built specifically around that constraint: oversized expressions, thick outlines, flat colors, and a mandatory transparent background. Upload your reference photo, then fill in your own emote list and style choice at the bottom.
Create a matching pack of Twitch/Discord chat emotes of the subject
in the attached photo - the pack listed under USER INPUT defines
exactly which emotes to make, one emote per listed expression. If
the CUSTOM PACK is selected, the expression list arrives under
'Extra notes'. Follow it literally, one emote per listed item.

IDENTITY: every emote must be unmistakably the SAME subject as the
photo and as each other. Carry the subject's defining features into
every single emote - face shape, skin/fur/surface color, hair style
and color, facial hair, glasses, ears, markings, accessories -
simplified into the art style but never dropped or changed between
emotes. EYE COLOR IS PART OF IDENTITY: first read the subject's real
eye (iris) color from the attached photo, then reproduce that SAME
eye color faithfully and consistently in EVERY emote. Do NOT copy
the photo's pose or camera angle - vary the pose freely to serve
each expression.

READABILITY AT TINY SIZE is the whole job: exaggerate the expression
to roughly 300% of natural; make the head fill almost the entire
canvas; use thick clean dark outlines; keep eyes and mouth oversized;
use a few flat high-contrast colors, no gradients, no fine texture,
no background elements. NEVER add text unless the expression's own
description names specific letters (like GG, W, L).

FORMAT - TRANSPARENCY IS A HARD REQUIREMENT: each emote is a square
1:1 PNG, delivered on a fully TRANSPARENT background with a REAL
alpha channel. First render on a clean solid-color background, then
run background removal to isolate the subject on genuine
transparency. Never leave a checkerboard, gray grid, or visible
backdrop.

DELIVERY: return each emote as its OWN separate square image - one
transparent PNG per listed expression, nothing combined into sheets.

Emote pack: gaming
Style: kawaii
Extra notes:
Example source image:
Example result:
5. Cropping the Sheet Into Individual Stickers
Whichever prompt you used, you'll end up with either one combined 3×3 sheet or several individual emote images. If you're working from a combined sheet, it needs to be split apart before any sticker app will accept it.
- Open the generated image in your phone's photo editor, or any basic image editor on desktop.
- Use the crop tool to select just one sticker from the grid, keeping the crop as close to square as possible.
- Save that cropped image separately — don't overwrite the original, since you'll need to go back to it eight more times.
- Repeat for each remaining sticker in the sheet, saving each one as its own individual image file.
6. Building the Pack on WhatsApp, One Sticker at a Time, With No Third-Party App
WhatsApp used to require a separate sticker-maker app for this entirely. That's no longer the case — WhatsApp now has a native sticker creation tool built directly into the app on both Android and iOS, along with a proper pack-building feature. Nothing else needs to be installed.
Step 1: Turn each cropped image into a WhatsApp sticker
- Open any chat, and tap the sticker icon in the message bar — on Android this sits inside the emoji picker; on iPhone it's its own icon directly next to the text field.
- Tap Create (shown as a pencil icon in the sticker tray).
- Choose one of your cropped sticker images from your photo gallery.
- WhatsApp automatically cuts the subject out from its background. You can also manually crop, rotate, draw on it, or add text and emoji at this step if you want to touch it up further.
- Tap the send button to confirm it. The finished sticker is now saved permanently into your personal sticker collection, ready to be grouped into a pack.
- Repeat this same process for each of your nine cropped images, one at a time, until all of them exist as individual saved stickers.
Step 2: Group them into a named pack
- Open the sticker tray again in any chat, where all your saved custom stickers are listed.
- Tap the pencil icon in the top corner to enter edit/selection mode.
- Select all nine of the stickers you just created.
- Tap the three-dot menu, then choose Add to sticker pack, then New sticker pack.
- Give the pack a name and save. It now appears as its own labeled collection inside your sticker tray.
Adding more stickers to that same pack later
If you make additional stickers afterward — say, a tenth expression you generated later — you don't need to rebuild the pack from scratch.
- Create the new sticker the same way, using Create from the sticker tray.
- Go back into the sticker tray, tap the pencil icon, and select just that new sticker.
- Tap the three-dot menu, choose Add to sticker pack, but this time select your existing pack from the list instead of creating a new one, and save.
This entire flow — creating each sticker, then grouping them, then adding more later — works identically on Android and iPhone. A similar built-in sticker creation tool is also available on WhatsApp Web and the Windows desktop app, accessed through the attachment/paperclip icon in a chat.
7. Building the Pack on Telegram
Telegram handles this differently, entirely through its own official bot rather than a third-party app.
- Search for @Stickers inside Telegram and start a chat with it — this is Telegram's own official bot for exactly this purpose.
- Send the command
/newpackto begin. - Follow the bot's prompts: give your pack a name.
- Send your first cropped sticker image directly in the chat.
- The bot will ask you to reply with an emoji that represents that sticker — pick whichever one feels closest to the expression.
- Once that sticker is confirmed, send your next cropped image, assign it an emoji the same way, and repeat until all nine are added.
- Send
/publishwhen you're done, and the bot hands you a shareable link to your finished pack that anyone can add with one tap.
8. A Few Things That Make This Go Smoother
- Generate the sheet at the highest resolution your AI tool allows — you'll be cropping small sections out of it, and starting low-res makes every individual sticker blurrier than it needs to be.
- If a specific sticker in the sheet comes out distorted or off-model, you can usually ask the AI to regenerate just that one expression rather than the entire sheet over again.
- Keep your nine cropped files clearly numbered in the order you plan to add them — it makes the repetitive add-and-repeat process on both platforms far less confusing halfway through.
- For Discord specifically, custom emotes are added through a server's own Settings > Emoji panel by a server admin, rather than through a personal sticker-maker app — worth knowing if your end goal is a Discord server rather than WhatsApp or Telegram.
Explore More Awareness & Security Content
Discover more security tips, threat analysis, hacking awareness, and practical guides designed to help you stay safe online.
Visit Awareness & Security →