Getting a valid TLS / SSL certificate without spending a penny is very simple. To do it, you just need to visit Startssl.com (for non-commercial use only). If you need a commercial-friendly certificate there is a very cheap solution at Namecheap to get a SHA256 cert for $9.

Before you do this, however, I’ll show you how to install everything you need, because merely obtaining a valid certificate does not make us safer. I also recommend you to use a non-SHA1 certificate cause Chrome is going to kill the support to it soon. In this tutorial, I will focus on one possible configuration for an Apache environment; and I’ll show you what to do with a WordPress website at the application level.
The first part of this tutorial will also be useful for non-WP-based applications. In addition to showing you how to install a certificate, I will explain how to migrate a website with an eye on SEO, avoiding unpleasant incidents of internal duplication and errors that could make the site unusable.
Installing mod_ssl, openSSL, and mod_spdy
The requirements for mod_ssl, openSSL and mod_spdy are Apache >= 2.2.4 and a series of GCC libraries greater than 6+ (only for spdy).
On an Ubuntu/Debian environment, it’s not so difficult to install what you need, because usually themod_ssl is pre-installed with the LAMP stack, so you will only need to enable it.
To enable the module, use the following command:
a2enmod ssl
Then you can enable the default virtual host to check that everything works fine.
a2ensite default-ssl
Afterwards, simply restart Apache.
/etc/init.d/apache2 restart
After completing the above three steps, to check if everything works, visit your IP address with a browser like https://yourip.
Now you should check your OS version with uname -m to find if it works on 32-bit or 64-bit because we need it to choose the right version of the spdy installer.
To obtain mod_spdy, you can use this page or a wget command line from shell requesting the package URL.
wget https://dl-ssl.google.com/dl/linux/direct/mod-spdy-beta_current_x86_64.rpm
And then
dpkg -i mod-spdy-*.deb apt-get -f install
After the installation you will find the repos file at the following path
/etc/apt/sources.list.d/mod-spdy.list
and the configuration file
/etc/apache2/mods-available/spdy.conf
Restart Apache
/etc/init.d/apache2 restart
Now open a Chrome Browser and visit chrome://net-internals/#spdy to check if spdy is working on your website.
Getting a free, and valid SSL/TLS certificate
Go to the Startssl.com and signup. The site isn’t exactly user-friendly, but it offers free, valid certificates that can be considered reliable for the vast majority of sites. If you want to get deeper into the subject of TLS, I strongly suggest you read Tim Nash’s post.
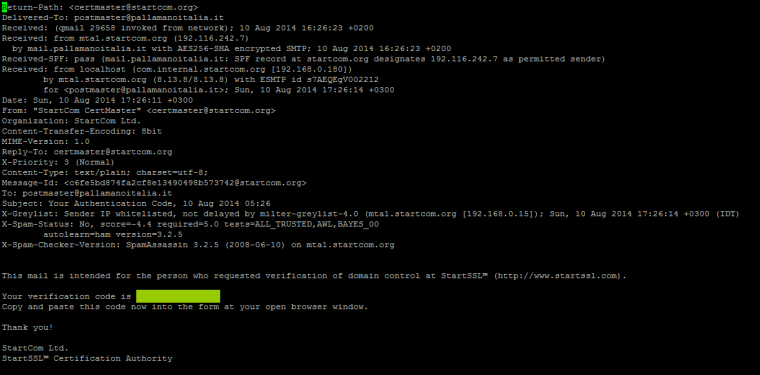
After registering, you will receive the following email:
This mail is intended for the person who requested to enroll at StartSSL (http://www.startssl.com).
Your authentication code is XXXXXXXXXXXXXX
Copy and paste this code now into the form at youropen browser window.
Thank you!
StartCom Ltd. StartSSL Certification Authority
Use the code that is blocked out here to verify your account and to receive a confirmation email with information on how to proceed.
To Andrea Pernici,
Your request for an account at StartSSL™ (http://www.startssl.com) has been approved and is available during the next 24 hours at the following location:  https://www.startssl.com/?app=12&action=release&i....
The verification code in order to continue the process is XXXXXXXXXXXXXX
Thank you!  StartCom Ltd. StartSSL™ Certification Authority
After these steps, you will be directed to a page where you will be asked to enter your code to start creating your first certificate.
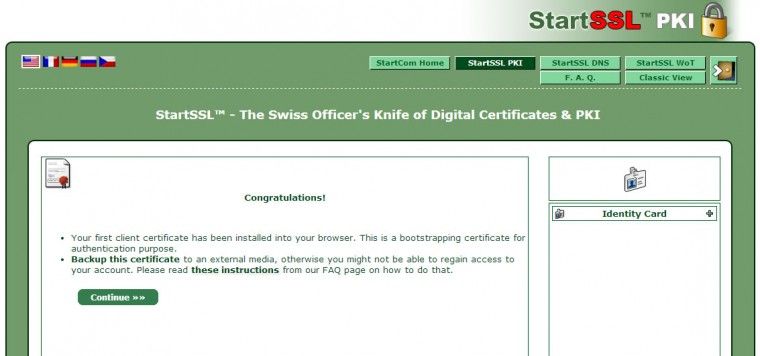
After clicking the Continue button, you will receive the following email, which instructs you to save your StartSSL certificate for future access to the control panel:
Hi Andrea Pernici,
Congratulations on your new StartSSL™ account!
Things you should know before proceeding: During enrollment, a client certificate was installed into your browser for the purpose of authentication.
This certificate allows you to securely access your account in the future.
Be sure to *backup* this certificate including the private key to an external media!
Failing to do so may result in the loss of your account.
Also, see https://www.startssl.com/?app=25#4 for more information about how to backup your client certificates.
Even though StartSSL™ generally provides certificates free of charge, revocations thereof may carry a handling fee.
Take great care of your private keys; and remember to save
and backup all files at all times!
Please take a moment of your time to visit the Tool Box section of your control panel, which provides you with many useful tools and utilities that may be of help when validating, creating, and installing your certificates.
Thank you for choosing StartSSL™!
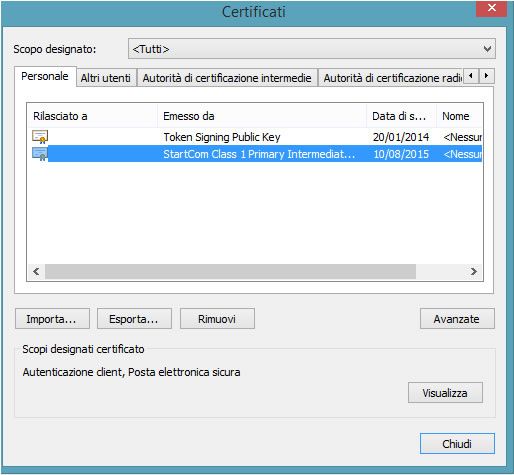
After this, save your key. (Here the instructions)
Sorry, the image is in italian, but the certificate tab in Chrome looks the same.
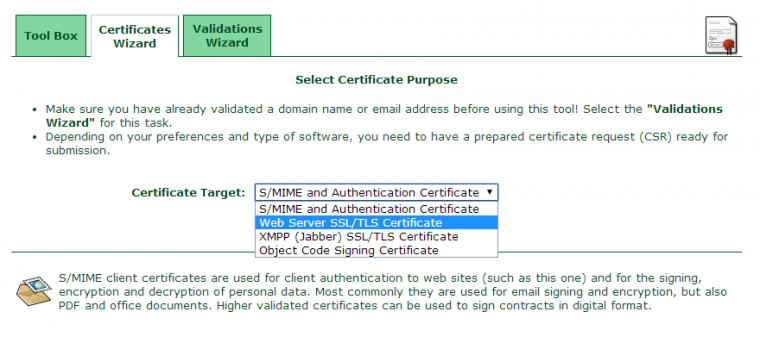
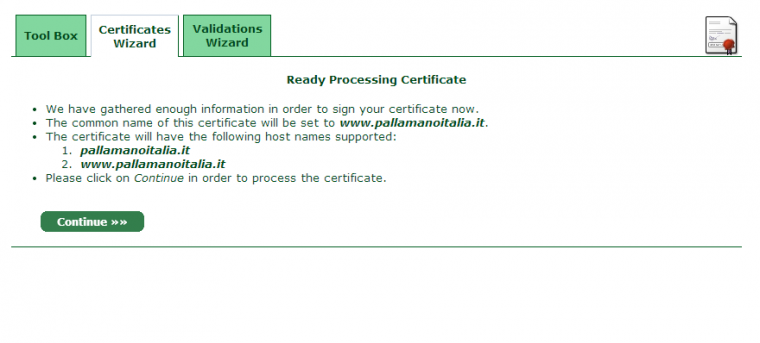
Finally, go to the control panel and start Express Lane to generate the SSL/TLS certificate associated with your domain.
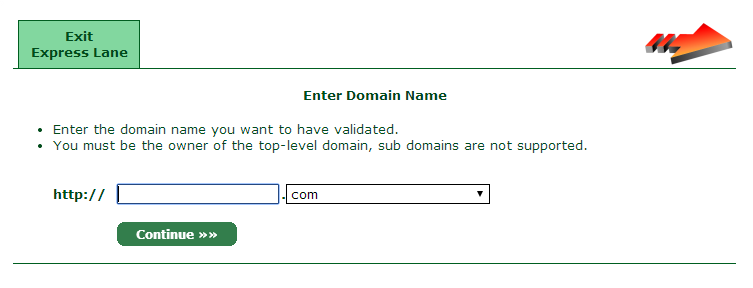
You must insert the domain name without “www” and then select one of the proposed emails to confirm the request. During this phase, you will see the following page:
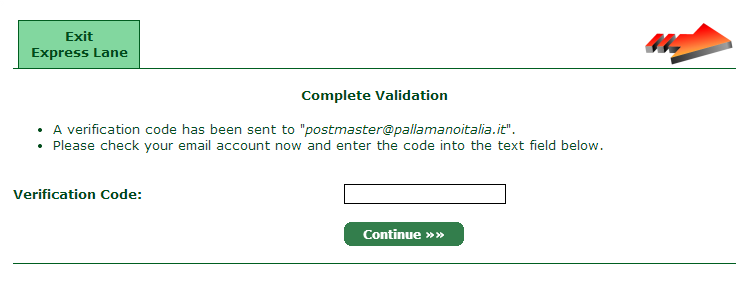
If you are installing a certificate, you will have access to a SHELL; so, you can open the mail directly with a command line and retrieve the activation code.
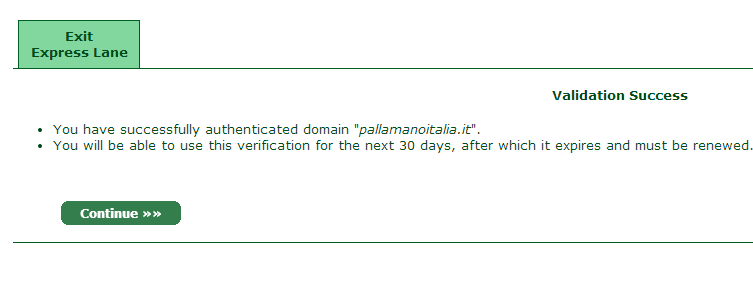
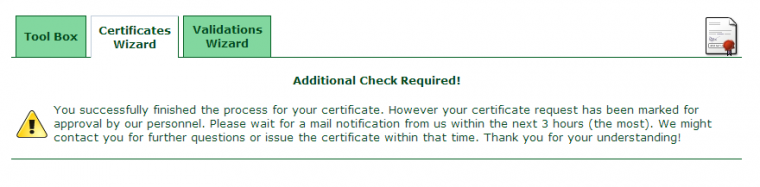
After confirming the code, you will see the following message. But it’s a little misleading — the message tells us that the requested task should be concluded in 30 days, not that the certificate itself will be valid for 30 days. The certificate is actually valid for one year.
If for any reason you can’t close the task immediately, you can restart it at any moment by selecting the Web Server SSL/TLS Certificate.
Using the Wizard, we can generate everything we need without going into multiple tools.
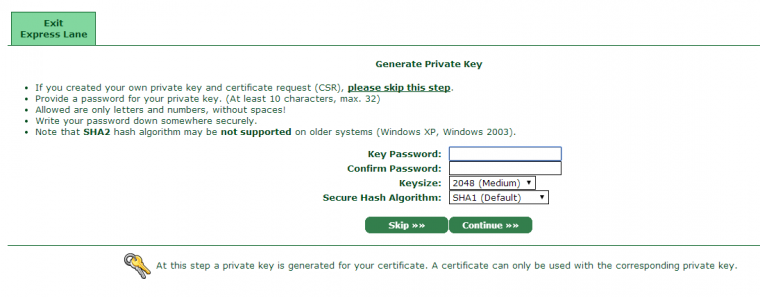
After you have chosen a password, a code will be generated. You only need to cut and paste it into a text file on your server and then execute the following command:
openssl rsa -in ssl.key -out ssl.key
Then insert the previously chosen password at the prompt and you’re all done.
After this step, we can add the subdomain to target and usually it is the WWW one.

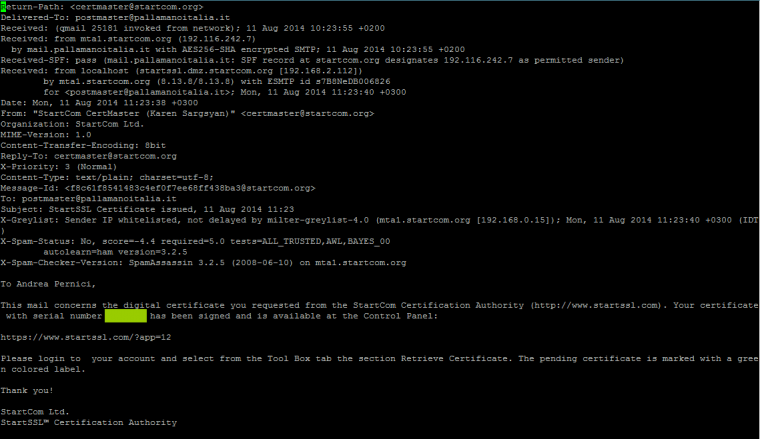
After a few minutes, a confirmation email will be sent to inform you that everything is fine.
Here you can see what the email informing you to retrieve the certificate from the control panel looks like.
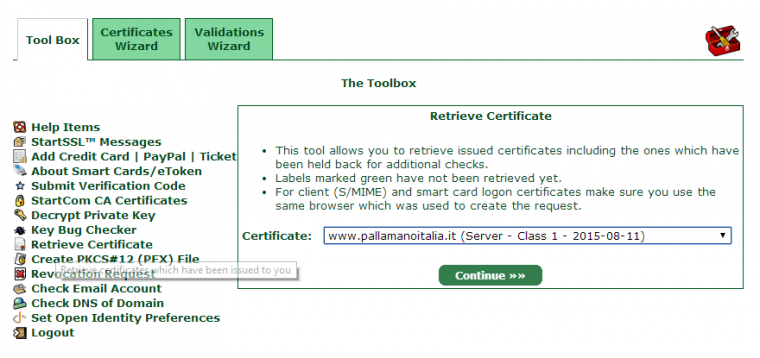
Now you can use the “Retrieve Certificate” menu on the control panel.
After the certificate is retrieved, you should add some lines of code to the virtual host file to make your webiste reachable using “https://.”
<VirtualHost pallamanoitalia.it:443>
DocumentRoot /home/path/public_html
ErrorLog /home/path/logs/pallamanoitalia.it_error_log
TransferLog /home/path/logs/pallamanoitalia.it_transfer_log
SSLEngine on
SSLProtocol all -SSLv2
SSLCipherSuite ALL:!ADH:!EXPORT:!SSLv2:RC4+RSA:+HIGH:+MEDIUM
SSLCertificateFile /home/path/ssl.crt
SSLCertificateKeyFile /home/path/ssl.key
SSLCertificateChainFile /home/path/sub.class1.server.ca.pem
CustomLog /home/path/logs/ssl_request_log<br> \
"%t %h %{SSL_PROTOCOL}x %{SSL_CIPHER}x \"%r\" %b"
</VirtualHost>
Save the configuration and test it with an apache2ctl configtest to check that every directive is working.
If everything is OK, you can proceed with an apache2ctl graceful.
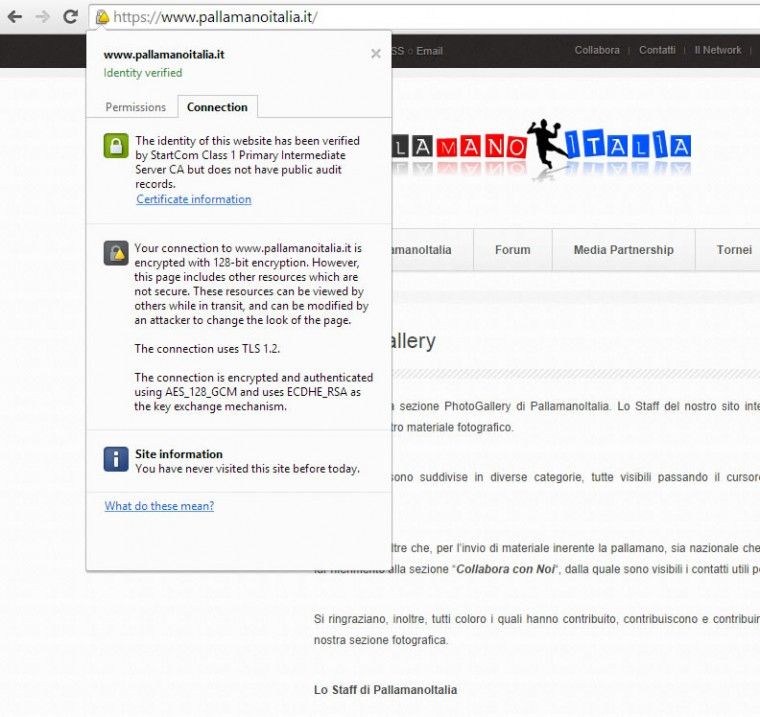
To check it live, visit https://www.pallamanoitalia.it (for this case study). If your configuration of the SSL/TLS certificate key and chain is error-free, then you won’t see any unreliable certificate errors in your browser, as you can see from the image below. The yellow icon is not a big issue, but only a warning that mixed content is being served from an “http://” connection.
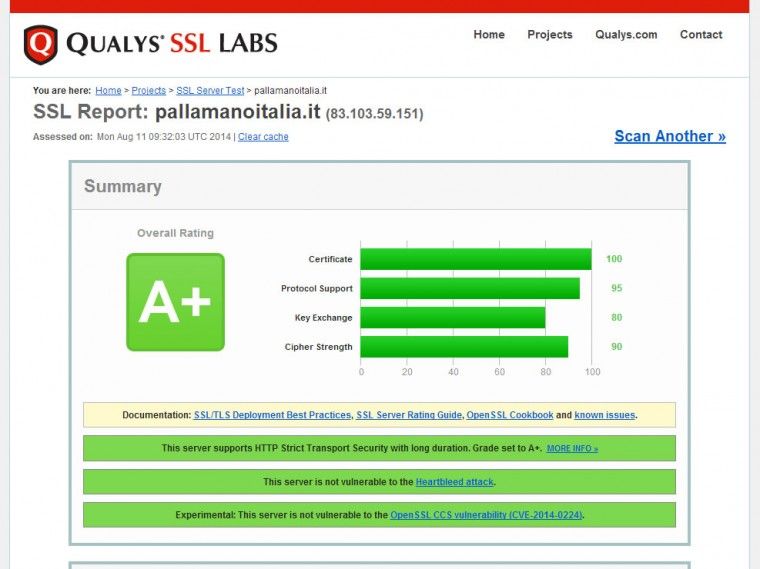
To test any issues, you can use the tool at ssllabs.com/ssltest/ (in our casehttps://www.ssllabs.com/ssltest/analyze.html?d=pallamanoitalia.it).
After inserting your website, the tool will start to elaborate;
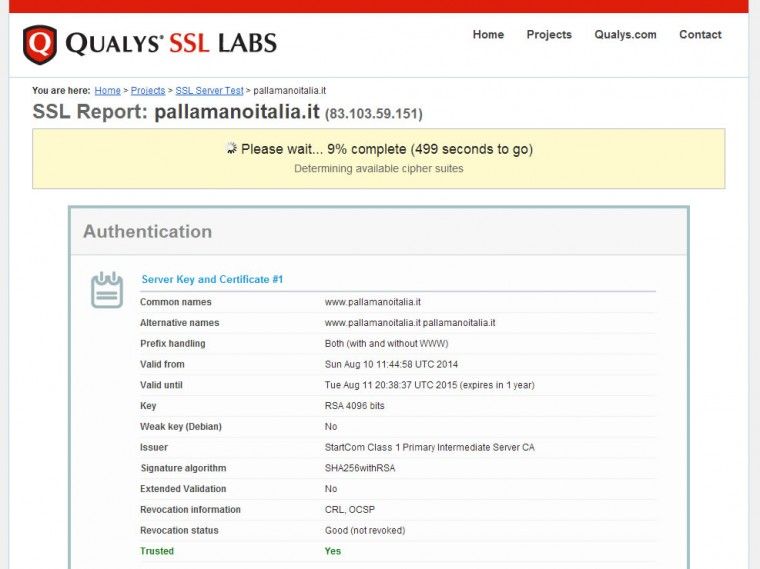
and, when it is finished, you will see your website’s overall rating, as well as detailed information about its TLS configuration. In the following example, after completing the first step, our configuration doesn’t look so good.
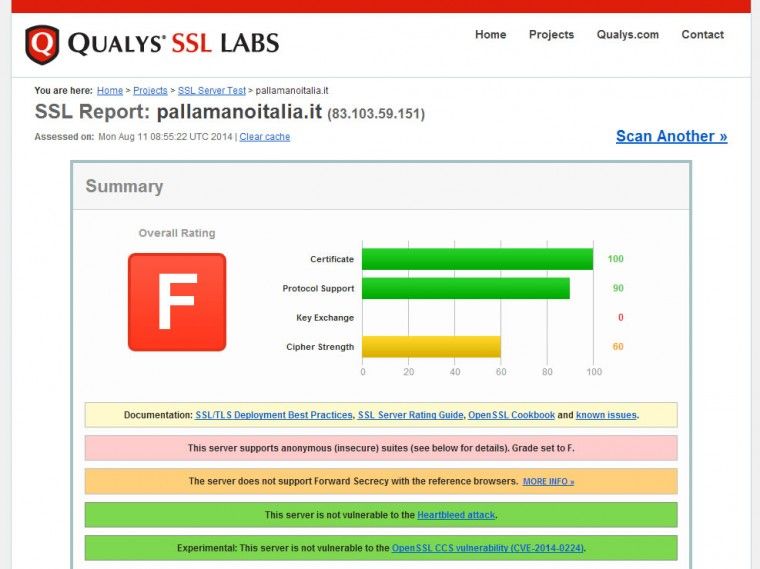
Let’s see what we can do to improve its security.
We can add the following lines (converting the directive we wrote before) to our virtual host file to prevent our system from loading the unsupported SSL versions we have on our server.
SSLProtocol all -SSLv2 -SSLv3
SSLHonorCipherOrder on
SSLCipherSuite "EECDH+ECDSA+AESGCM EECDH+aRSA+AESGCM EECDH+ECDSA+SHA384 EECDH+ECDSA+SHA256 EECDH+aRSA+SHA384 EECDH+aRSA+SHA256 EECDH+aRSA+RC4 EECDH EDH+aRSA RC4 !aNULL !eNULL !LOW !3DES !MD5 !EXP !PSK !SRP !DSS"
The warning that the tool gives us is, in fact, related to the OpenSSL configuration that is based on the software we run on our Debian installation.
In any case, you can find more details here.
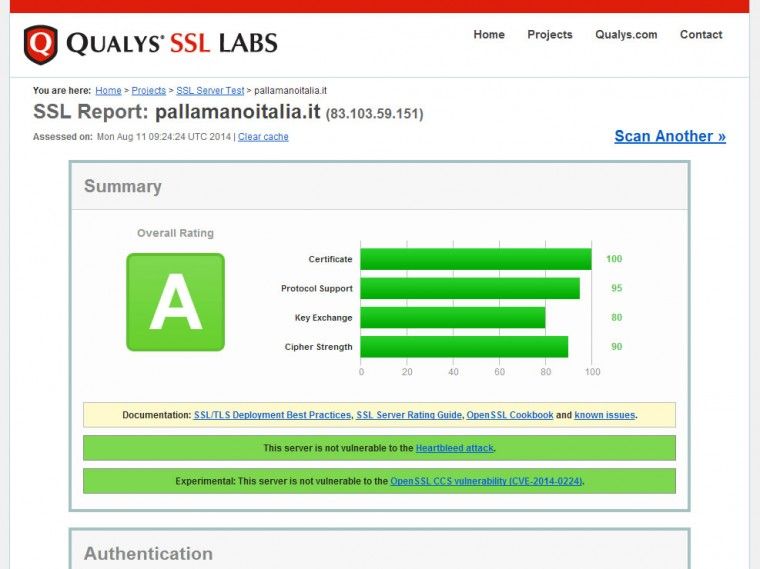
After refreshing the test after the edit, we can see that the overall rating is lots better than before; however, we can improve it further by reading all the information provided by the tool.
In our case, we can add the following lines to the virtual host file and
<Directory /home/path/public_html>
Header always set Strict-Transport-Security "max-age=63072000; includeSubDomains"
</Directory>
obtain an even better result: If you want to get deeper into Strict Transport Security (HSTS), read this post by Eric Law.
You can also use a new option, introduced by Ilya Grigorik, to include your website in the Chrome Preload list for HSTS websites, simply adding the preload header as follows
<Directory /home/path/public_html>
Header always set Strict-Transport-Security "max-age=63072000; includeSubDomains; preload"
</Directory>
and then submitting your URL at https://hstspreload.appspot.com/.
At this point, we have a working TLS configuration with mod_spdy running, which performs better than a classic TLS/Apache configuration. Now we are ready to make changes to our own application so that it serves only on HTTPS.
Redirect 301 and canonicalization
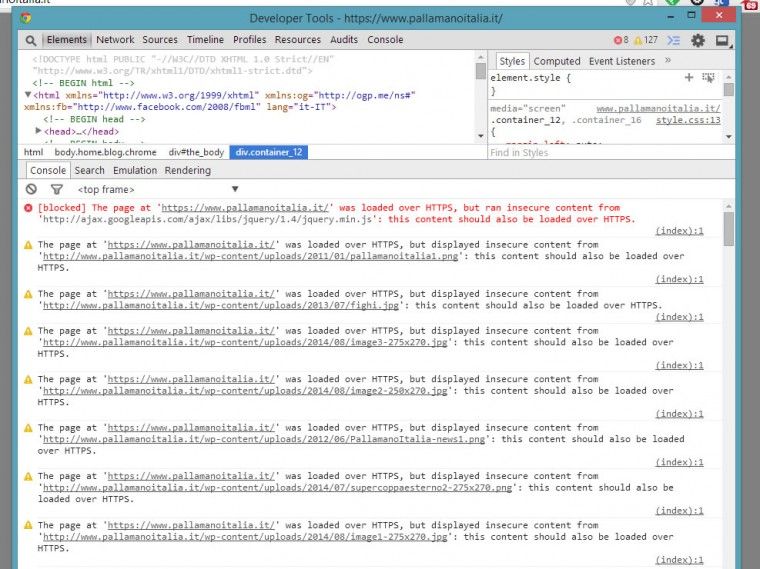
To prevent internal duplication issues, you need to configure your application to run only on HTTPS, instead of HTTP. You may also need to include all the resources (internal and external) from a relative “//” path in order to allow those resources to be served from the best path.
This can help to prevent blocking errors on the browser, which can make your website completely unusable (as with JavaScript files).
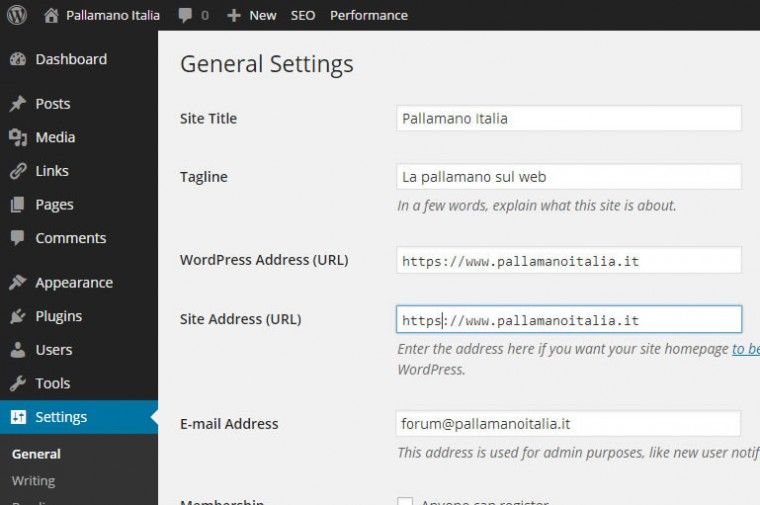
In our case, we are pretty lucky, because our website is running on WordPress, and we don’t need to do a lot to make it completely usable on HTTPS.
Go to “Settings > General” and add a nice ‘s’ in the address input box
If everything is fine, then you will be logged out from the admin panel. Log in again and if we useYoast plugin, as I recommend on my italian SEO guide, go in “SEO > Permalinks > Canonical configuration” and select “Force transport on HTTPS”.
You should see some issues; so, you should make sure that all the resources are served on HTTPS instead of HTTP. To do so, add two lines of code on your virtual host TLS configuration to let all the HTTP resources being redirected with a 301 to the respective HTTPS one.
if you write in the browser http://www.pallamanoitalia.it/immagine1.jpg you will be redirected to https://www.pallamanoitalia.it/immagine1.jpg. This is important for search engine and for user to prevent the HTTP resource being blocked by the browser when accessing the page in HTTPS.
RewriteCond %{HTTPS} off
RewriteRule (.*)$ https://www.pallamanoitalia.it$1 [L,R=301]
Then, to force the WordPress admin panel using TLS, add the following directive to the wp-config.php file:
define('FORCE_SSL_ADMIN', true);
define('FORCE_SSL_LOGIN', true);
Fixing a WordPress theme path
Our website definitely includes some hardcoded paths in “http://”; so, we need to find all occurences of these paths and convert them to ‘//.’ To find them easily with a SHELL command, we will use the following grep
cd /home/percorse/public_html/wp-content/themes/mytheme/
grep -R 'http://' *
to list all occurences of the searched string:
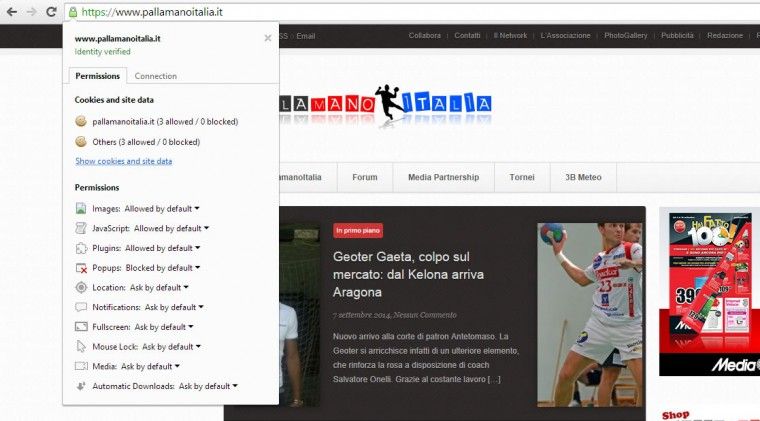
at this stage, we can easily edit all the files that are hardcoding the website path to prevent any kind of usability issue.
Now that we have removed all the mixed content serving, the browser lock become green as you can see below:
Configure Mod_pagespeed per TLS
This is not a mandatory thing, but on my server runs mod_pagespeed so I show you the configuration inside the virtualhost file dedicated to the HTTP.
ModPagespeedRewriteLevel PassThrough
ModPagespeedEnableFilters prioritize_critical_css
ModPagespeedEnableFilters insert_dns_prefetch
ModPagespeedEnableFilters add_head
ModPagespeedEnableFilters combine_javascript
ModPagespeedEnableFilters combine_css
ModPagespeedEnableFilters outline_css
ModPagespeedEnableFilters move_css_above_scripts
ModPagespeedEnableFilters move_css_to_head
ModPagespeedEnableFilters convert_meta_tags
ModPagespeedEnableFilters extend_cache
ModPagespeedEnableFilters inline_import_to_link
ModPagespeedEnableFilters rewrite_css
ModPagespeedEnableFilters rewrite_images
ModPagespeedEnableFilters rewrite_javascript
ModPagespeedEnableFilters rewrite_style_attributes_with_url
ModPagespeedEnableFilters collapse_whitespace
ModPagespeedEnableFilters elide_attributes
ModPagespeedEnableFilters convert_jpeg_to_progressive
ModPagespeedEnableFilters convert_png_to_jpeg
ModPagespeedEnableFilters convert_jpeg_to_webp
ModPagespeedEnableFilters insert_image_dimensions
ModPagespeedEnableFilters inline_images
ModPagespeedEnableFilters recompress_images
ModPagespeedEnableFilters resize_images
ModPagespeedEnableFilters inline_preview_images
ModPagespeedEnableFilters resize_mobile_images
ModPagespeedEnableFilters remove_comments
ModPagespeedEnableFilters lazyload_images
ModPagespeedEnableFilters defer_javascript
ModPagespeedEnableFilters sprite_images
ModPagespeedDomain www.pallamanoitalia.it
ModPagespeedDomain pallamanoitalia.it
After the HTTPS migration we need to adjust the above configuration to be served on HTTPS and working well with mod_spdy. Moreover we can also use mod_pagespeed to force the stripping of the absolute path.
the last part means that with the “ModPagespeedEnableFilters trim_urls” directive we can make mod_pagespeed automatically remove the http://domainname.com making all the resources accessible from the right path.
ModPagespeedFetchHttps enable
ModPagespeedSslCertDirectory /home/path
ModPagespeedSslCertFile sub.class1.server.ca.pem
ModPagespeedMapOriginDomain "http://www.pallamanoitalia.it" "https://www.pallamanoitalia.it"
ModPagespeedFetchFromModSpdy on
ModPagespeedEnableFilters trim_urls
If you want to get deeper into mod_pagespeed, you can find the official documentation here.
Let’s try to test how fast our TLS website is (even if we didn’t optimize it a lot) with WebPageTestand identify any bottlenecks or slowness of our configuration.
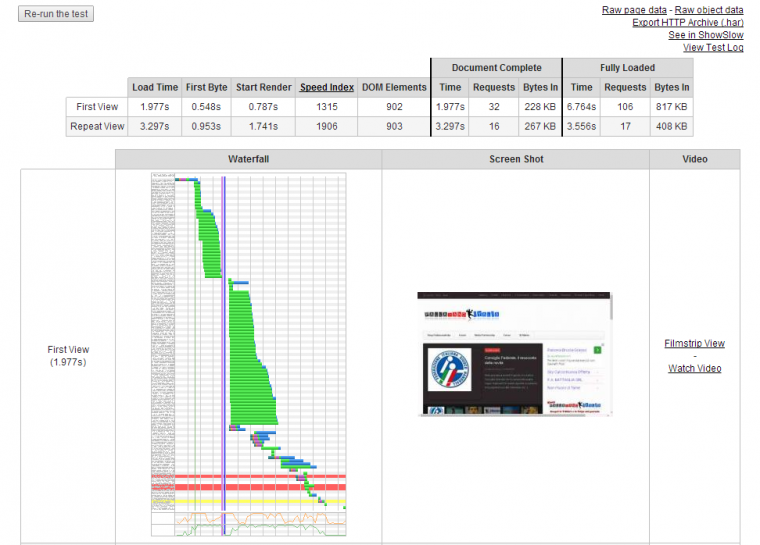
As you can see, it looks pretty good, as it started rendering in less than one second. So is this TLS?It seems to be.
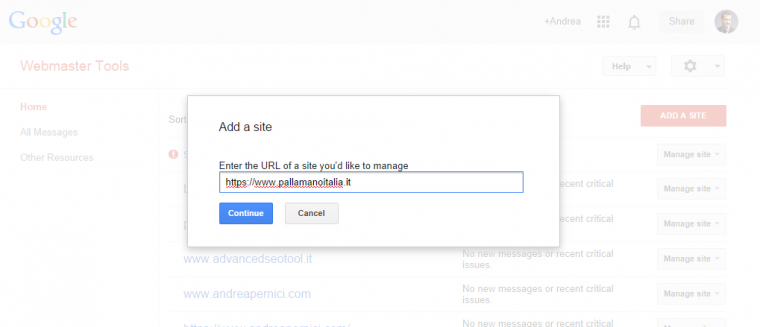
Activating Google Webmaster Tools for the TLS version
As you already know, the HTTP and HTTPS versions are considered two different websites, so assuming that you already added the http website to Webmaster Tools, you should also add the HTTPS version inside Webmaster Tools to monitor all the issues and stats after the migration.
After a few days, you should start to see all your data on the HTTPS version, if everything is fine.
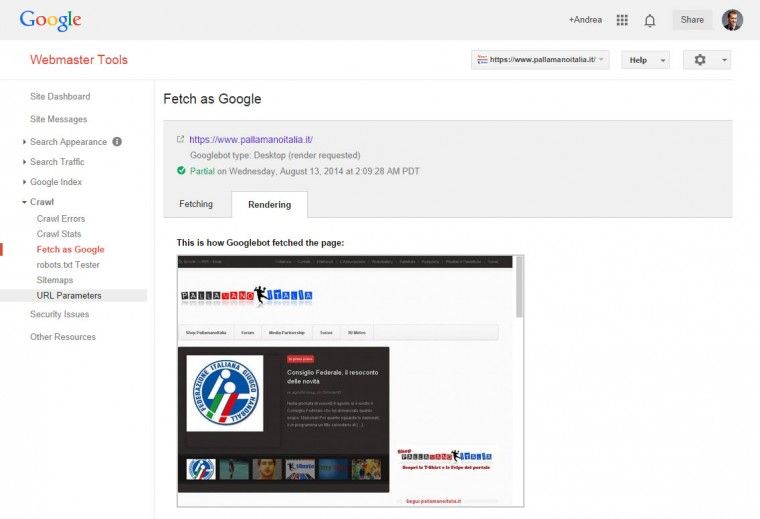
One of the most important things you can do to make sure that Google can see, read, and render your website without any block is to use the Fetch as Googlebot tool inside the Webmaster Tools.
If you see any errors on my free certificate, let me know. Anyone can make a mistake.
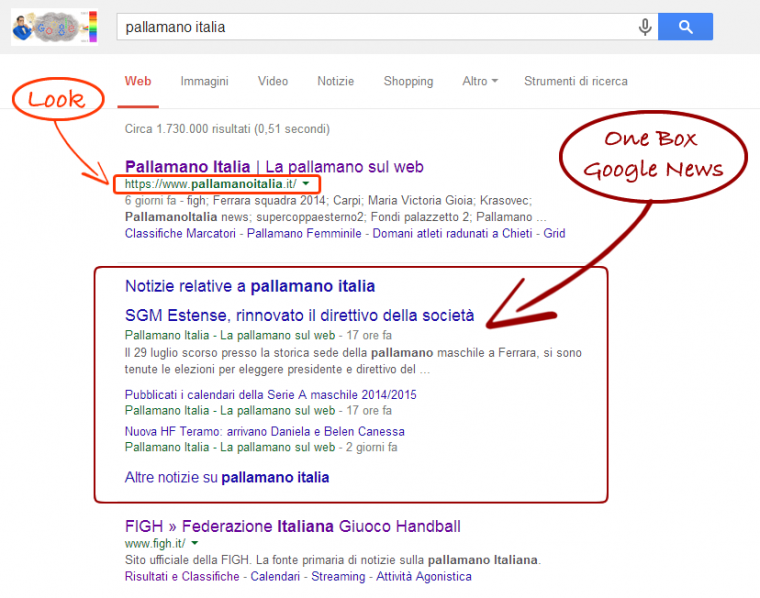
The day after our update – 13-08-2014
By performing a search for the brand name, we can see the migration in action, without any issues on Google News.
After a few more days
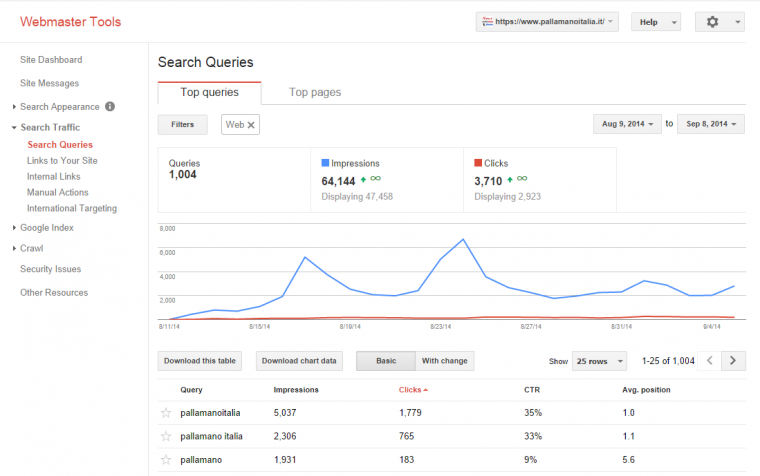
Visiting webmaster tools we can see some encouraging data:
The migration is starting to use the query panel.
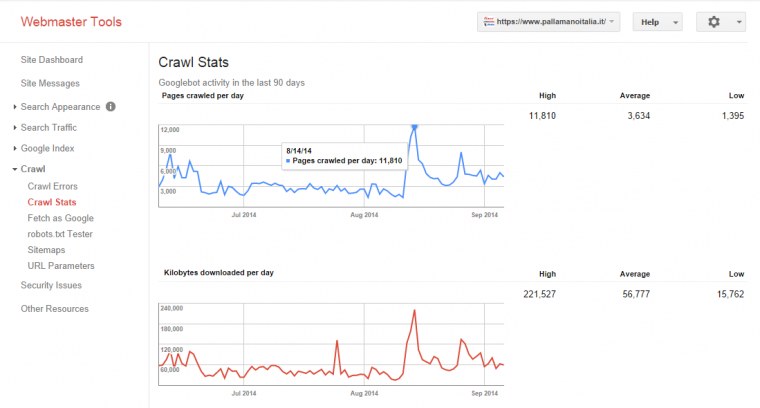
The crawling stats panel shows a peak.
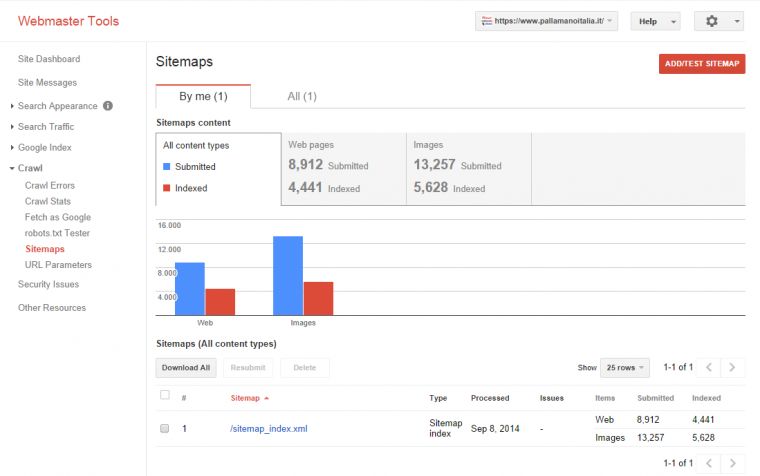
And the sitemap is showing some newly indexed pages.
We are on the right path and we aren’t wasting any money.
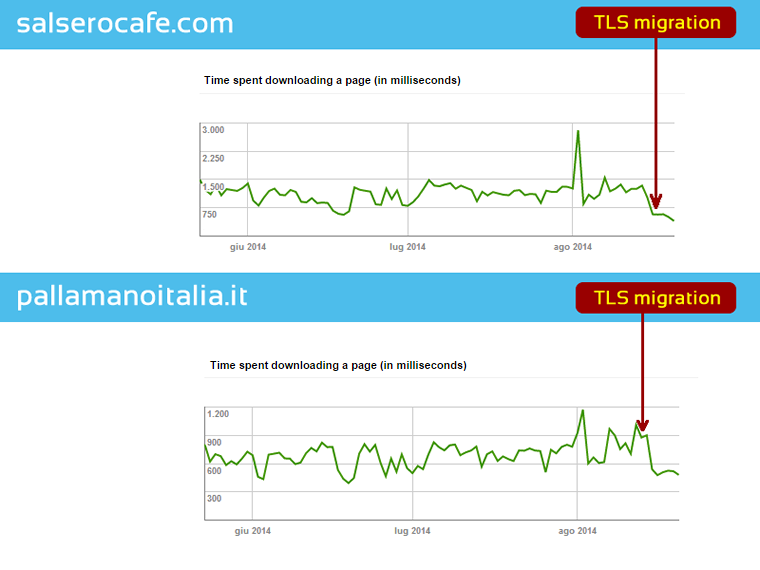
Will my SSL/TLS slow down? Not at all, if you know what to do.
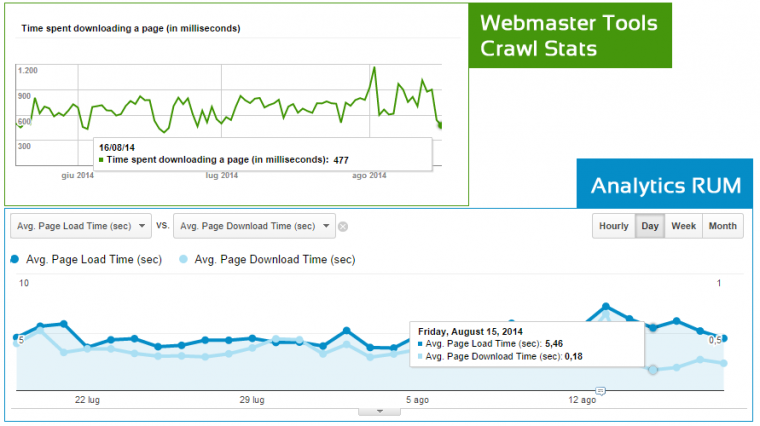
As you can see from these images, a few days after the migration, there is no discernable slowdown or performance degradation for the HTTPS version.
Make it more complex by using SNI to add another SSL site on the same server.
I don’t like to make only the most obvious choices; so, I tested an SNI approach against a single TLS one, creating a new certificate for another domain on the same server to show that you can have more than one website running on the same host with different TLS certificates.
We’re going to do exactly the same as we did for the previous website, making some small changes at the Apache level.
All you need to know is here on the Apache Wiki. Below you can see how I configured the second virtual host to make it work on the same server using NameBasedSSL Virtualhost.
The first step is to add a line of code to the global configuration file (but which one will depend on your preferences). You must open the file with
vim /etc/apache2/apache2.conf
and add
NameVirtualHost YOURIP:443
After this step, you can edit your second virtual host configuration, adding all the directives needed and the path to the new generated certificates as follows:
<VirtualHost YOURIP:443>
ServerName salserocafe.com
ServerAlias www.salserocafe.com
DocumentRoot /home/salseroPATH/public_html
ErrorLog /home/salseroPATH/logs/salserocafe.com_error_log
TransferLog /home/salseroPATH/logs/salserocafe.com_transfer_log
DirectoryIndex index.html index.htm index.php index.php4 index.php5

SSLEngine on
SSLProtocol all -SSLv2 -SSLv3
SSLHonorCipherOrder on
SSLCipherSuite "EECDH+ECDSA+AESGCM EECDH+aRSA+AESGCM EECDH+ECDSA+SHA384 EECDH+ECDSA+SHA256 EECDH+aRSA+SHA384 EECDH+aRSA+SHA256 EECDH+aRSA+RC4 EECDH EDH+aRSA RC4 !aNULL !eNULL !LOW !3DES !MD5 !EXP !PSK !SRP !DSS"

SSLCertificateFile /home/salseroPATH/ssl.crt
SSLCertificateKeyFile /home/salseroPATH/ssl.key
SSLCertificateChainFile /home/salseroPATH/sub.class1.server.ca.pem
CustomLog /home/salseroPATH/logs/ssl_request_log \
      "%t %h %{SSL_PROTOCOL}x %{SSL_CIPHER}x \"%r\" %b"

<Directory /home/salseroPATH/public_html>
Header always set Strict-Transport-Security "max-age=63072000; includeSubDomains"
</Directory>
</VirtualHost>
Now the Salsero TLS virtual host is OK; and you need to modify the Pallamanoitalia’s one too changing the virtualhost listening and adding the ServerName as follow
<VirtualHost YOURIP:443>
ServerName pallamanoitalia.it
ServerAlias www.pallamanoitalia.it
</VirtualHost>
Afterwards, you can try an apache2ctl configtest to check that your configuration is error-free. Then, restart Apache.
Now when you visit Salserocafe and Pallamanoitalia, you should see both websites working on HTTPS without any warnings or certificate errors. Look here and here to check them yourself.
You will see a new warning on the tools that reads:
That means on all the modern browsers. Try to guess which browser does not support SNI? I know you know the answer.
One last thing:
Remember to set a default TLS virtual host, for example, on YOURIP address ServerName to prevent a massive duplication of the default TLS website, which will be accessible for any non-configured HTTPS version of all the other virtual hosts on your server.
vim /etc/apache2/sites-enabled/default-ssl
<IfModule mod_ssl.c>
<VirtualHost YOURIP:443>
        ServerName YOURIP
        ...
</VirtualHost>
</IfModule>
Remember to repeat all the steps explained for Pallamanoitalia and monitor the evolution of the migration looping for every website you want to migrate.
Crawl Efficiency
Let’s see what happened in terms of crawl efficiency after a few days.
Don’t believe everything you read about HTTPS and site performance. I was able to find concrete answers in data and tests that took a minimum of time. Sometimes, all it takes is the desire to explore the technology to its full potential.
Conclusion
Although this is not a comprehensive or absolute guide, but only a case study of a job done in less than two hours, I hope that it will be useful to everyone after Google’s controversial announcementabout TLS as a ranking factor. My findings refute the common belief that migrating to TLS is difficult and expensive, AND that it can lead to a performance degradation.
The same kind of debate happened around the Responsive Design movement, and it will continue to happen when people insist on blaming issues on technological shortcomings, when the reality is they haven’t learned to fully use the technology to its potential.
We need to grow up and stop complaining.
Nothing is impossible. All it took was some simple trial and error. Updating security settings to your website should not be considered impossible without making sacrifices to your site’s performance. That said, I would recommend that you strongly consider the needs of your site’s audience when deciding whether or not it’s worth your time to upgrade from HTTP to HTTPS.
In this case, I’ve shown you how to go HTTPS using a free certificate on a WordPress installation. I have also tested Comodo certificate bought on NameCheap for nine dollars a year on a server with a lot of constraints. The cheaper software was still better than having nothing at all.
If you want to migrate to HTTPS, there are alternatives to the more expensive and difficult solutions out there. You just need to be creative and display a full understanding of how the update works, and you need to experiment with those free or low-cost solutions that have a proven history of performance in order to have the best chance of success. (Thanks to Giacomo Pelagatti for the inspiration.)
Please give me feedback if you want me to cover some other aspect of this subject and remember: Don’t believe anything you read, especially if it tells you that something is bad or impossible.
Andrea Pernici is Search Marketing Manager at GT Idea. His duties there include supervising internal development, speaking at conferences, managing their community magazine and forums,and consulting for big brands. His last contribution to the SEMrush blog was entitled: “The Great Debate: Website Speed and SEO Value.“
original article : http://www.semrush.com/blog/how-to/seo-friendly-migrate-website-http-https-free/